
Appearance
PopClip Extensions Directory / Submit an Extension
Want to make your own extension?
Extensions can be as simple as a few lines of text. Learn how in the Developer Documentation.
Submit an Extension
Extensions are submitted from public GitHub repositories.
First you will need to publish your extension in a public GitHub repository, if you have not done so already. Then, configure your repository using the instructions below.
The directory automatically reads your changed extension source files each time you publish a git tag. It only does this once for each tag, so any change you want to make to a published extension requires a new tag. (Monorepos are supported.)
The directory stores copies of the source files and processes them. It will extract metadata from the Config file and sign and zip the extension.
Submission agreement
By submitting an extension, you agree to the following. If you don't agree, please don't submit.
- You keep your copyright. Your extension remains yours. Nothing here transfers ownership of it to me.
- It's yours to submit. You wrote the extension, or you otherwise have the right to submit it and to give the permissions below.
- Permission to distribute. You give me permission, without payment, to store your submitted files, to package and sign them, to distribute the result through this directory and through PopClip's update mechanism, and to show your extension's name, description, icon, readme, author credit, and other content on this website and in the PopClip app.
- Permission for users. You allow anyone to download and use your extension. If you include a license file, that license governs whatever else people may do with your code.
- You are responsible for it. Be prepared to be contacted by other PopClip users via GitHub about bugs, feature requests, etc. Be aware that things may break. For example, a third-party service may change its API, or a macOS update or PopClip update may break something.
- Do no harm. It goes without saying that your extension must absolutely respect the user and must never do anything to harm the user or their computer. Respect their privacy, too: if your extension sends the selected text, or any other data, to you or to a third-party service, say so plainly in your readme. Never collect or transmit anything the user wouldn't expect.
- It must be reviewable. Everything in the package must be readable source. Minified source or pre-compiled binaries can't be reviewed and won't be published.
- Some content is off limits. Extensions relating to gambling, adult content or illegal file sharing will not be published.
- Publishing and listing are at my discretion. I decide what gets published, and what is listed on the front page, and I may unpublish anything at any time. See the listing guidelines for what I look for.
- Withdrawal. Contact me if you want your extension unpublished. Copies already installed by users are unaffected.
- No guarantees. I provide this directory free of charge and as-is, with no promise of availability.
1. Prepare your extension
Package
Each extension you want to submit should be a .popclipext package within a public GitHub repository you own.
Monorepo-style workflows are supported, so you can include multiple extensions in one repository — see Updating one extension out of many. Alternatively, you can submit extensions from separate repositories if you prefer.
Example structure:
 MyGitHubRepository/
  ∟ LICENSE
  ∟ popclip-directory.yaml
  ∟ source/
     ∟ MyExtension.popclipext/
        ∟ Config.ts
     ∟ MyOtherExtension.popclipext/
        ∟ Config.yaml
Do not submit a zipped .popclipextz file — it will not work.
Paths must not change
After you submit an extension for the first time, its source repo and path must not change. If you rename a package folder, move it within the repo, or move it to a different repo, your next submission will fail. (You can rename the repo or change your github username, since the directory uses numerical github IDs.)
Required fields
Your extension's Config must contain all of the following, or it will be rejected automatically:
name— the extension name.identifier— a unique identifier string. This is the primary identifier for your extension in the directory and it can never be changed.description— a concise description to be shown in the directory. Typically one sentence.popclip version— the minimum required PopClip version as an integer, e.g.6221, which is the current shipping version. Normally the version you tested against, but you can set an older version if you want to support older PopClip versions and you are sure your extension will be compatible.
Additionally, for extensions with Shell Script actions:
shellScriptRationale— an explanation of why the extension needs to use a shell script and can't be implemented with JavaScript. See Shell script policy.
Limits
- No more than 100 files per extension.
- No single file larger than 1 MiB (1,048,576 bytes).
- No more than 2 MiB in total (2,097,152 bytes).
Readme and demo
You can enhance your directory listing with an optional readme file and demo video (example):
A Markdown
readme.mdfile (any capitalisation) in the root of the package folder is picked up automatically and shown on the extension's page.A
demo.mp4ordemo.gifin the root of the package folder is shown as a looping demo video.
To keep the final file size down, readme and demo files are automatically excluded from the zipped extension that users download.
Using images in readme files
The readme can include inline images, specified as a path relative to the package root. For example, in markdown: . Use an underscore name prefix to keep images out of the final downloadable zip.
Externally hosted images are not allowed and will be replaced with a "[Remote image removed]" placeholder when the readme is rendered.
The Featured slot
The directory's front page opens with a Featured box showing one extension a day. To be eligible, an extension needs a demo video in MP4 format (not GIF). See Featured slot for the requirements.
Keywords
The directory's search box matches against your extension's name and the names of any associated apps — but not its description. If there are other words people might search for, add a keywords field to your Config:
yaml
name: Convert
description: Convert between imperial and metric (SI system) units.
keywords: imperial metric si units conversion miles yards feet inches
The keywords field is one plain string, not an array: just words separated by spaces. Matching is case-insensitive.
Changelog
I encourage you to include a changelog to let users know what has changed in each version. Put it at the foot of your readme. Suggested format:
markdown
## Changelog

- 2026-08-14: Added support for xyz.
- 2026-07-02: Initial release.
Excluded files
Any file or folder within the source package whose name starts with . or _ is automatically excluded from the final packaged extension.
Credits
The directory will automatically credit you as the extension's author and maintainer by linking to your repository and GitHub user page. Put any additional acknowledgements in your readme.
License
Add a LICENSE file in your repository root if you want a licence shown. GitHub detects it and the directory displays the license name (such as "MIT License") and a link to the license text.
2. Install the GitHub app
Install the PopClip Directory GitHub app on the repository (or repositories) you want to submit from.
I recommend installing it on selected repositories only — just the ones you submit extensions from. Installing on all repositories works too (a repository takes part only if it contains the configuration file described below), but selecting repositories keeps the app's access to the minimum.
The app asks for read access to code, which GitHub requires for the app to receive tag-push events and to fetch your extension's files, and read and write access to checks, so it can report results on your commits. It cannot modify your code.
3. Add a configuration file
Create a file called popclip-directory.yaml in the root of your repository. Its presence is what opts the repository in. Example:
yaml
include: "source/*.popclipext"
versionPrefix: v
Glob patterns must be quoted
Strings containing an asterisk (*) must be quoted in YAML.
The keys are:
include(required) — one or more paths or glob patterns matching your extension package folders. Use.if the repository root is the package.exclude(optional) — patterns to ignore.versionPrefix(optional) — a prefix your tags use, e.g.v. It's stripped off to get the version number, and tags without it are ignored.
Example of multiple include patterns:
yaml
include:
  - Alpha.popclipext
  - Beta.popclipext
versionPrefix: v
Example of using exclude:
yaml
include: "*.popclipext"
exclude:
  - Gamma.popclipext
versionPrefix: v
In patterns, * matches within a single path segment and ** matches across segments — so experimental/* covers that folder's immediate contents, while experimental/** covers everything beneath it at any depth. (The pattern engine is picomatch with default settings.)
4. Tag a version and push
Version numbers are one to four non-negative integers separated by dots, with no leading zeros. (Zero on its own is fine.)
- Valid:
0.1,1,1.0,159,3.6.2,5076.95.0.1 - Not valid:
1.00,2.05,1.7-beta2
Each new version must be higher than the last one you submitted.
Tag the release and push the tag along with your branch:
bash
git tag v1.2
git push origin main v1.2
Or publish a release through the GitHub website, which creates the tag for you.
Tag tips
Tags can be annotated or lightweight, it does not matter. Make sure to push both the commit itself and the tag. If in doubt, git push && git push --tags usually does the trick!
Updating one extension out of many
A tag covers your whole repository, but that doesn't mean everything in it gets a new version. For each package matched by your include patterns, the directory compares that package folder's git hash against what it already holds:
- Unchanged — skipped entirely. The extension keeps the version it already has.
- Changed, or new — submitted, taking its version number from the new tag.
So you can edit one extension in a repository of fifty, push a single tag, and only that extension gets a new version. (This is how my own repository of 200+ extensions works.)
One consequence is that each extension's version is the tag in which it last changed, so version numbers across a repository drift apart. If Alpha and Beta are both at 1.0 and you edit only Alpha before tagging v1.1, then Alpha becomes 1.1 and Beta stays at 1.0. That is normal and expected.
Starting small
If you have many extensions and would rather submit only one or two to begin with, name them individually in include instead of using a catch-all glob, and widen it when you're ready.
5. Watch for the result
Within a few seconds a check named Submission Check appears on the tagged commit, and completes with a summary of what happened to each package.
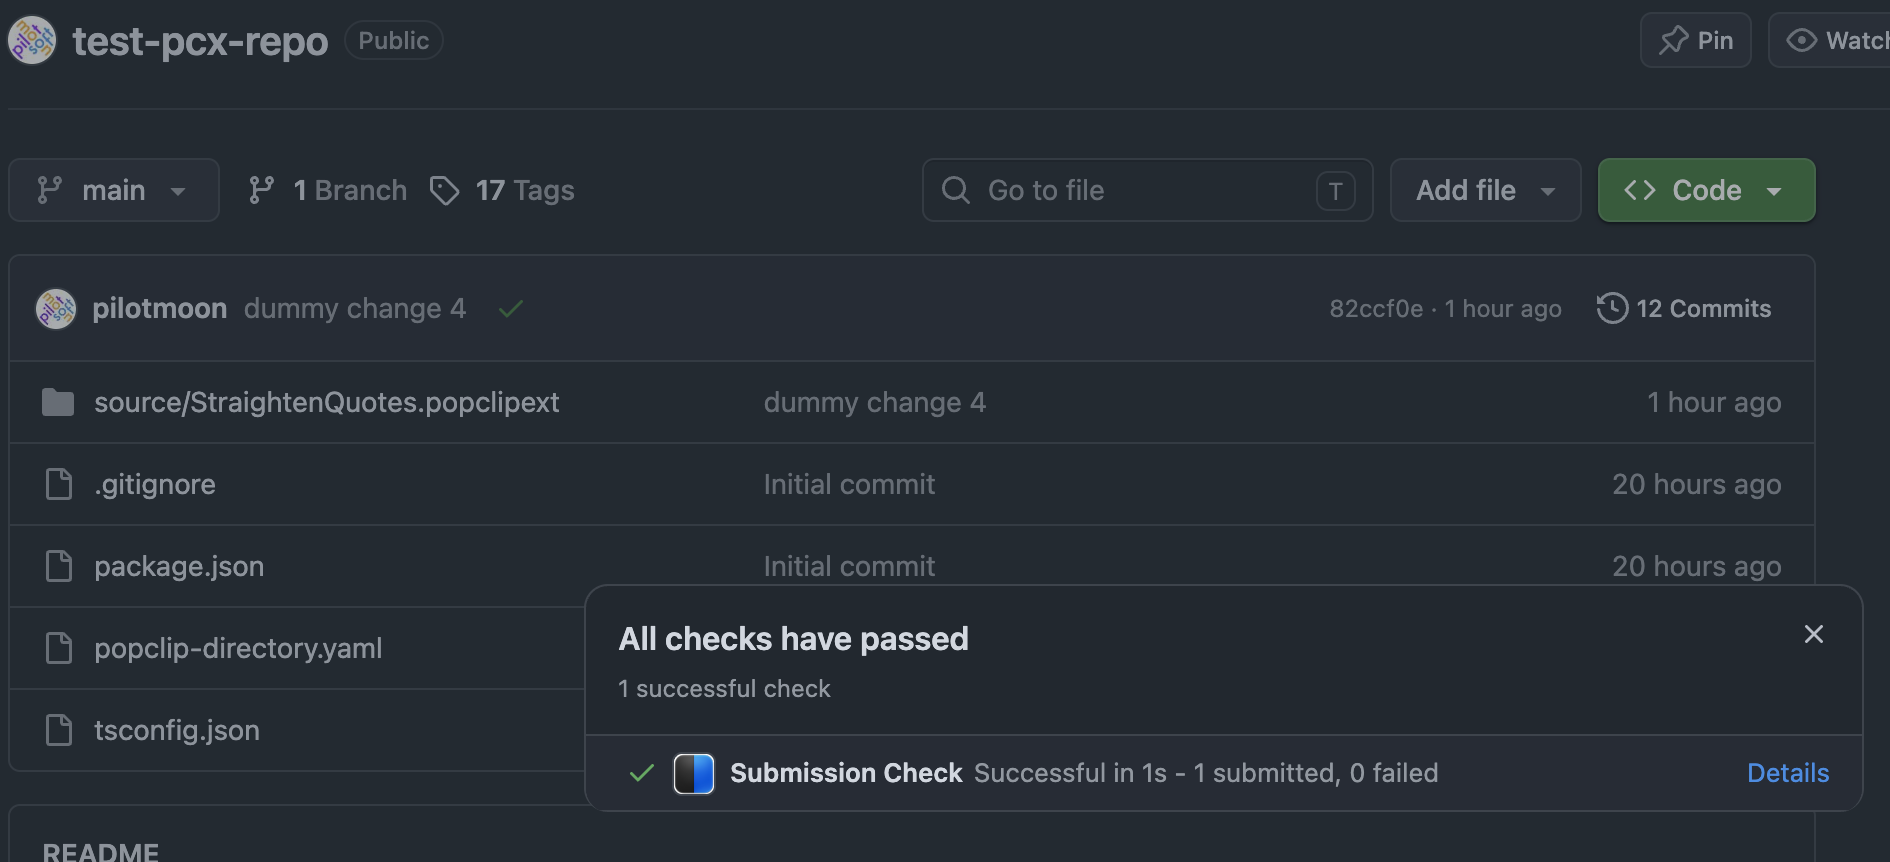
You'll also get a comment on the commit — and an email, if you have GitHub email notifications enabled for commit comments:
- Received — your extension passed the automated checks and is queued for review.
- Could not be processed — something failed validation. The comment says what was wrong. Fix it and push a new tag.
- Published — your extension is live, with a link to its page.
6. Review and publication
Submissions aren't published automatically — each one is reviewed by hand. This may take several days, or longer, so please be patient. The review checks that the extension works, does what its readme says, and complies with the submission agreement.
Once published, your extension gets a page of its own and becomes downloadable as a signed .popclipextz file.
Your author page lists everything you've contributed and is yours to share:
https://www.popclip.app/extensions/authors/your-github-usernameExtensions on your author page are not listed on the directory's front page right away. The front page is curated: extensions are added to it selectively, following the listing guidelines below. Your author page link works either way, so you can share your extension immediately.
All published extensions (whether listed on the front page or not) are eligible for automatic updates within the PopClip app. Updates are subject to the same review as initial submissions.
Listing guidelines
The front page of the directory is curated by hand and the quality bar for listing is higher than for mere publication on your author page. This is what I look for:
- A clear single purpose. The extension should do one thing that is genuinely useful, and the name and description should make it obvious what that is.
- Good presentation. A well-chosen icon, a helpful readme, and a concise description that reads well in the directory listing.
- Works out of the box. A listed extension must not require the user to install helper executables that aren't included in a stock macOS installation, such as the Xcode command line tools or scripting languages like python3.
- A clear open-source license. Include a license file in the repository.
- Link the app name and website in the metadata. If the extension works with another app or website, use
appto specify the app name, website, and — for native apps — bundle identifier(s). Not only can this helpfully prompt the user to visit the website if they don't already have the app installed (whencheckInstalledis set), but it will also link the app name in the description to the website. - Linked apps must be notarized. An extension which links to an app will only be listed if the app is Developer ID signed and notarized by Apple.
The above is a partial list of guidelines. Meeting these guidelines makes listing on the front page more likely, but there are no guarantees. Listing is at my discretion.
Featured slot
The Featured box on the directory's front page shows one extension a day. To be eligible, an extension needs a demo video in MP4 format (not GIF) with an aspect ratio of roughly 2:1 — anywhere between 3:2 and 5:2 is accepted — not more than about 10 seconds long, and with no sound. The demo video must show what actually happens when you click your extension's action; a video of the PopClip bar appearing and showing your action icon is not sufficient.
Shell script policy
Extensions submitted to the directory should use JavaScript actions in preference to Shell Script actions. Use a shell script only when the action genuinely needs one to do something that would be impossible with PopClip's internal JavaScript API.
If your extension does have a Shell Script action, its Config must include a shellScriptRationale field giving a brief explanation (at least 20 characters) of why the action needs a shell script:
yaml
shellScriptRationale: Sends the selected text to the printer using lpr.A submission with a shell script action and no rationale is rejected automatically. Add a rationale only when the action genuinely cannot be done in JavaScript. Otherwise, you should port the extension to JavaScript before submitting again.
Why? Shell scripts run with full user privileges and can access anything on the user's Mac. They require a much higher level of scrutiny and are thus more demanding to review. For that reason, I only want to have to review and sign shell scripts if they are absolutely necessary for the function of the extension.
JavaScript actions run in PopClip's sandboxed JavaScript environment and can work with the selected text, clipboard, apps and URLs, and with the network entitlement they have network access for making API calls. JavaScript actions execute more quickly too, since they don't have to shell out to an external task.
Example: the same action, both ways
A shell script action that searches GitHub for the selected text and opens the first matching repo, as an installable snippet — select the whole block and PopClip will offer to install it:
sh
#!/bin/sh
# #popclip
# name: Lucky Repo (sh)
json=$(curl -s "https://api.github.com/search/repositories?q=$POPCLIP_URLENCODED_TEXT")
url=$(echo "$json" | python3 -c "import json,sys; print(json.load(sys.stdin)['items'][0]['html_url'])")
open "$url"
This is a carefully written script: it quotes its variables and uses PopClip's pre-encoded POPCLIP_URLENCODED_TEXT instead of interpolating the raw selection. Even so, it has to bring in an external tool to parse the JSON — here python3, which macOS doesn't ship. It spawns three processes to do what is really one HTTP request. And it runs with full user privileges, so a reviewer still has to read it defensively.
The same action as JavaScript:
js
// #popclip
// name: Lucky Repo (js)
// entitlements: [network]
const axios = require("axios");
const response = await axios.get("https://api.github.com/search/repositories", {
  params: { q: popclip.input.text }, // encoded correctly, automatically
});
popclip.openUrl(response.data.items[0].html_url);
Nothing to escape, nothing to install, no processes spawned. Even the last line is better: the shell's open can only launch the default browser, while popclip.openUrl() opens the link in the browser the user is actually working in, with PopClip's usual modifier behaviours like holding Shift to open it in the background.
This policy applies not just to Bash/Zsh etc., but any script executed using the Shell Script action type. This includes Python, Ruby, Perl, etc.
Troubleshooting
- The GitHub repository must be public.
- The PopClip Directory app must be installed on that repository.
popclip-directory.yamlmust be in the repository root of the tagged commit, and itsincludepatterns must actually match your package folders.- The tag must match your
versionPrefix, if you set one. - You must actually push the tag to GitHub as well as the commit.
- An extension with a shell script action must have a shellScriptRationale in its Config.